During winter, when the sky is clear, we can often witness northern lights above Whitehorse, YT. I wanted to capture these aurora events and share them with family and friends so I decided to create a camera that would live stream a view the sky on the internet.
I borrowed the idea from AuroraMax but I didn’t want to spend too much money in the construction so I chose to use a small USB camera instead of a large and expensive DSLR. I was inspired by Martin Lewis all sky camera which he built using an ASI120 astronomy camera. This camera uses USB to communicate with a computer. The maximum length for USB 2.0 cables is around 5m. This means that your camera can’t be more than 5 meters away from your computer. This is somewhat limiting when you want to put a camera on a roof. Instead, I decided to bring the computer inside the camera enclosure by using a small but fairly powerful computer. i.e. a Raspberry Pi 2. I added a USB wifi dongle to transfer images from the computer to the wireless router.
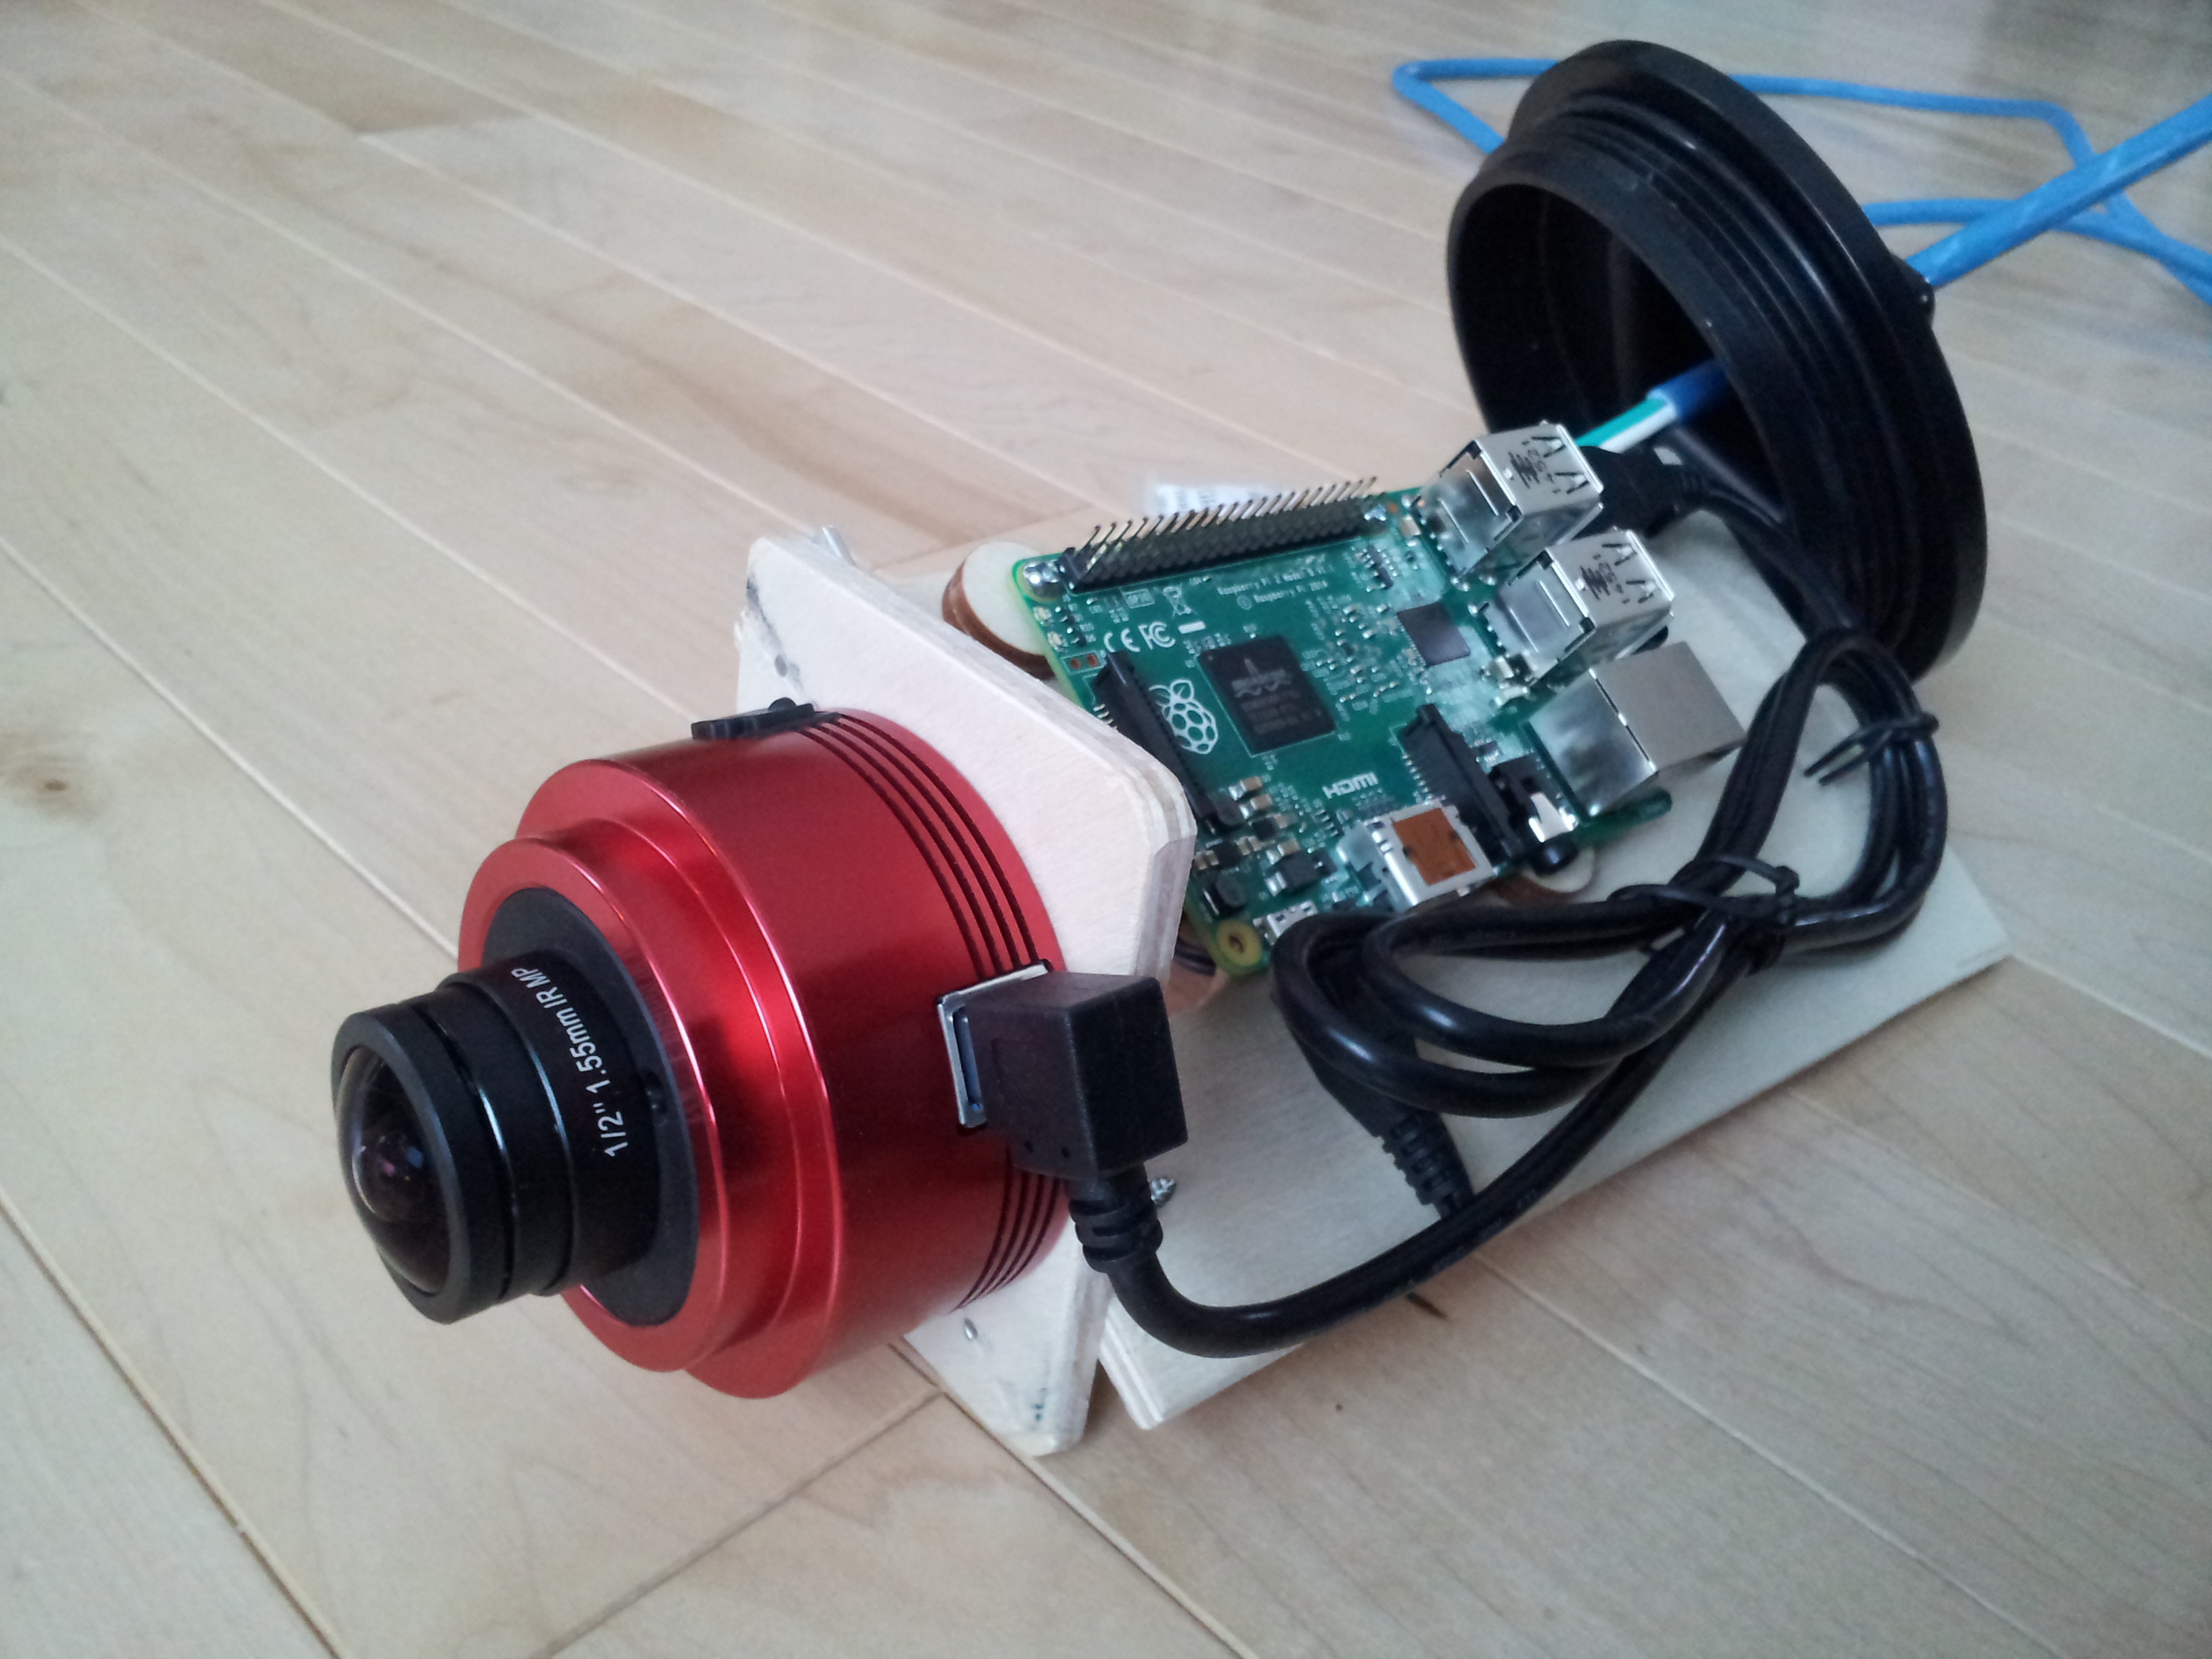
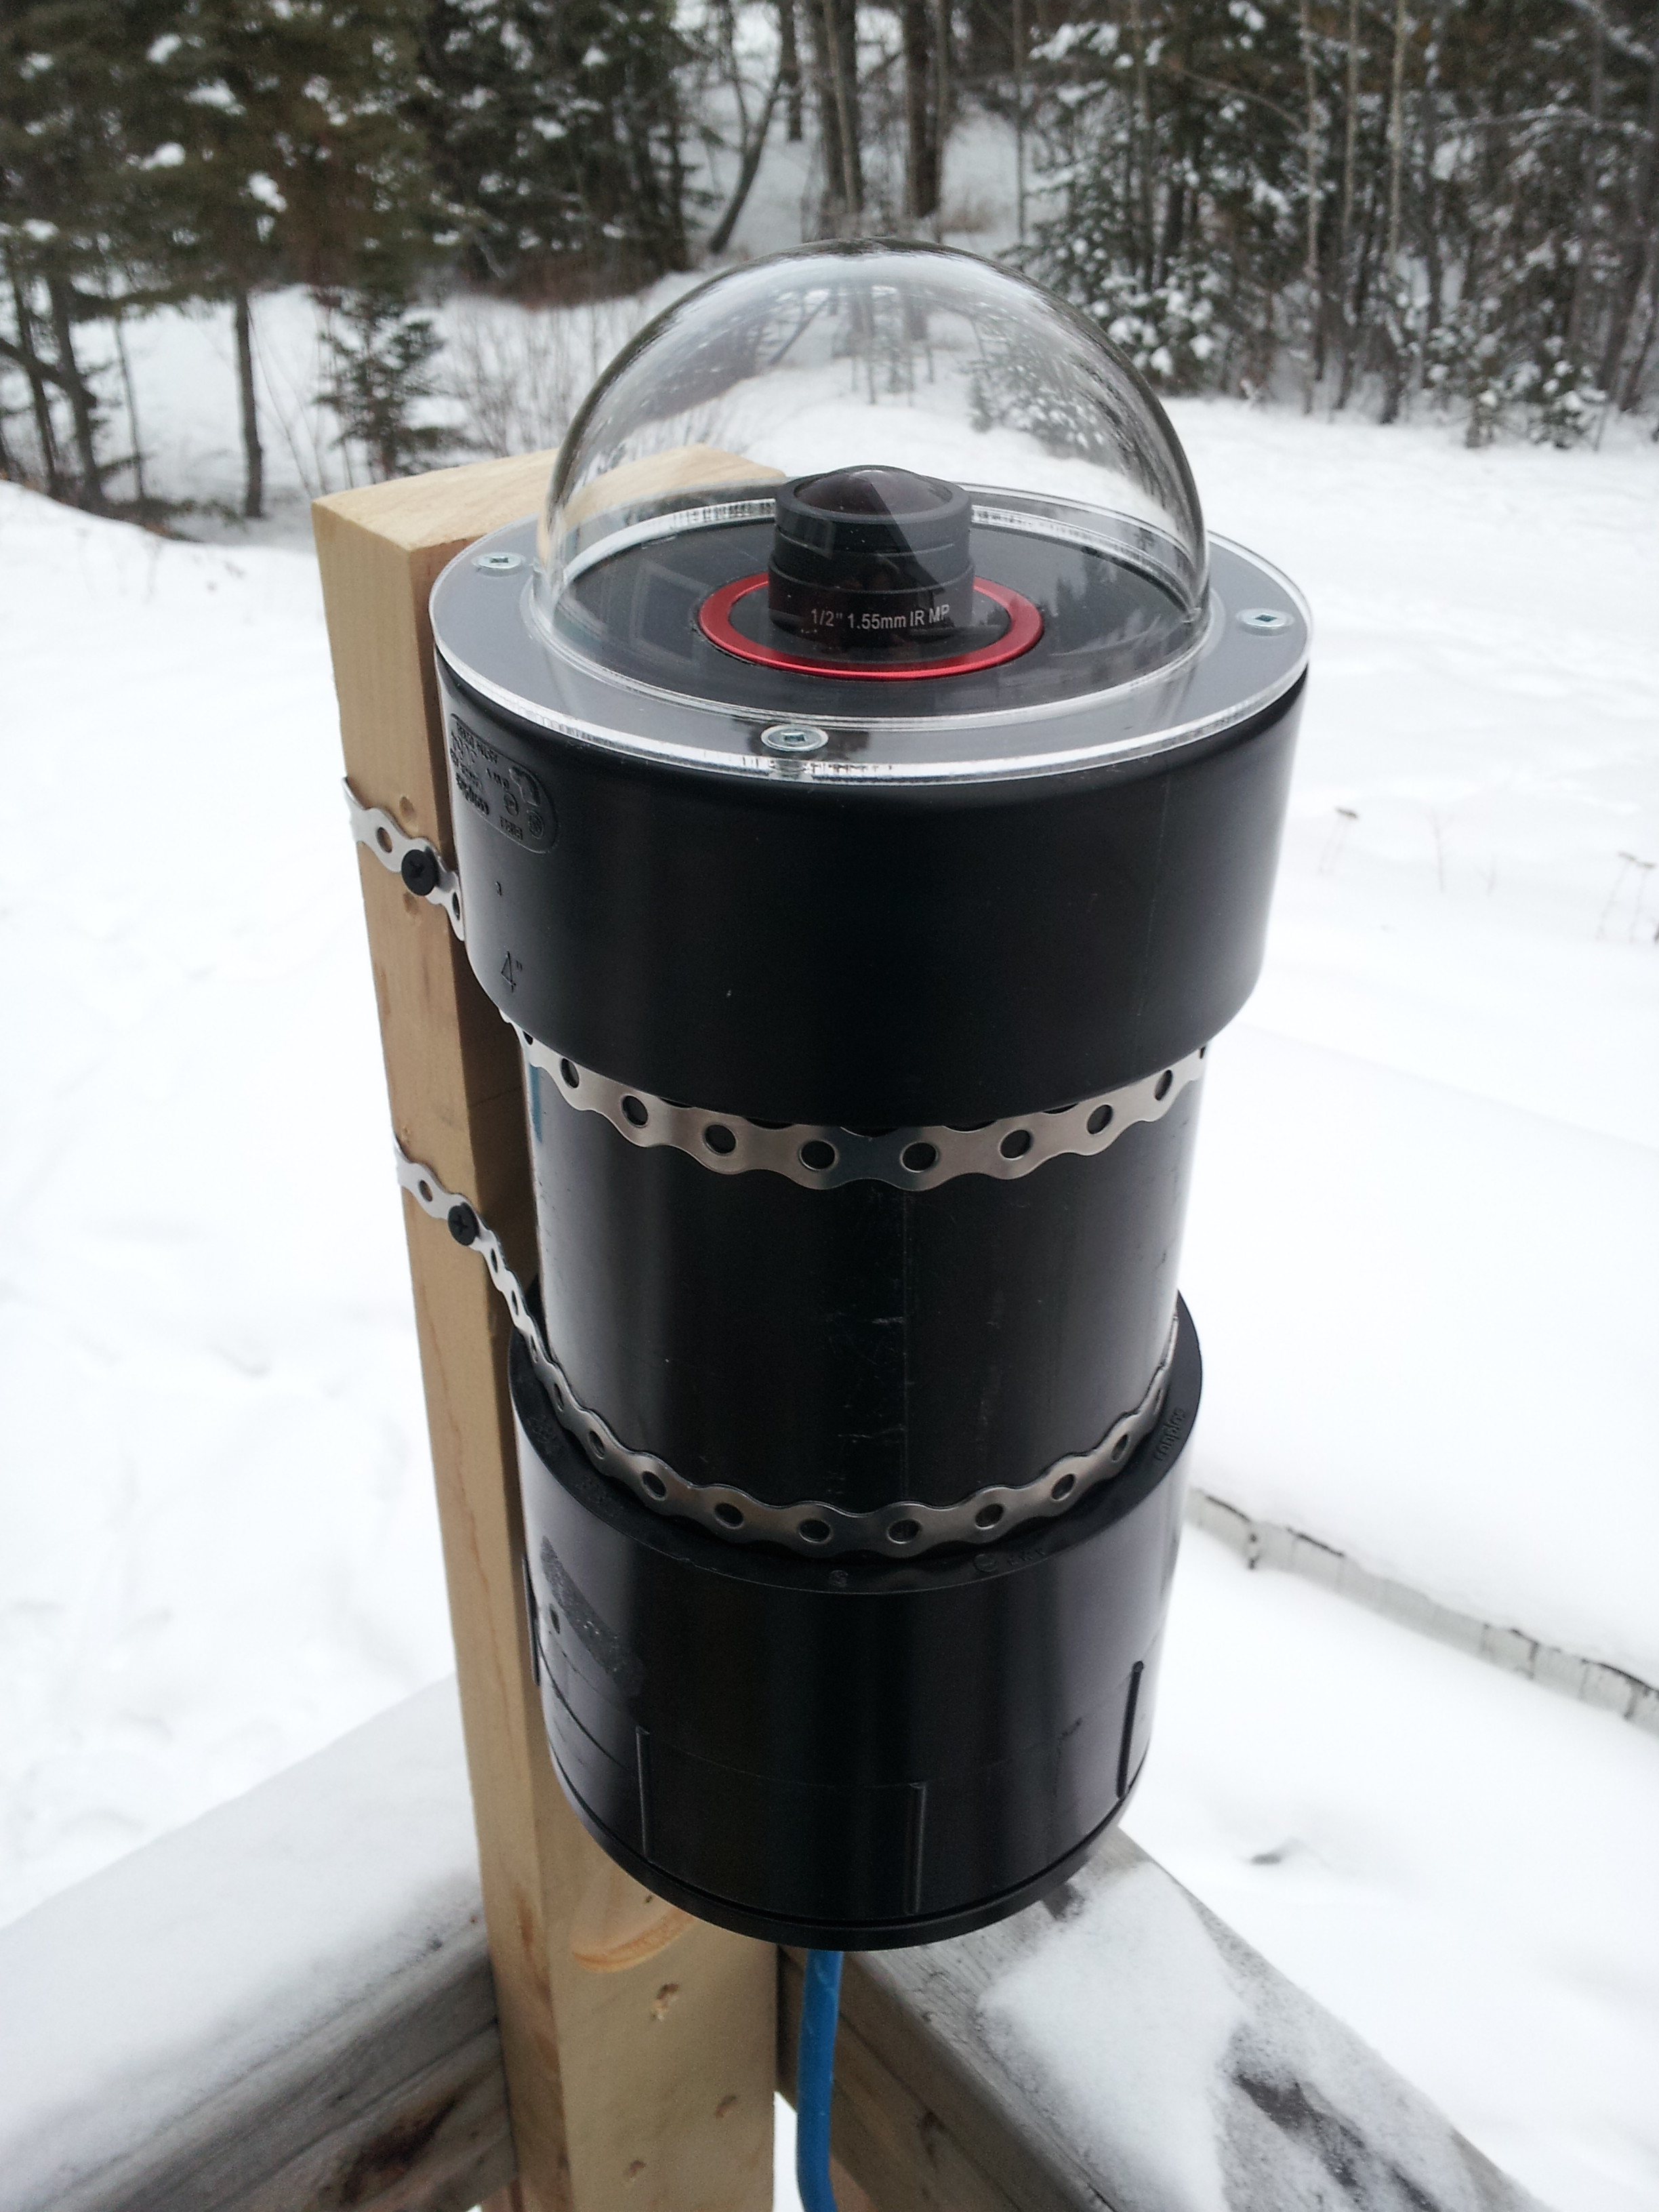
The enclosure of the camera consists of a 4″ ABS pipe with 1 end cap and 1 threaded end cap. A hole is cut in the top one to accommodate the lens and an acrylic dome is screwed over the lens. The bottom cap can be open to access the computer and camera.
Only a main power cable comes out of the camera. The maximum distance of the device is only dictated by the range of your wifi.
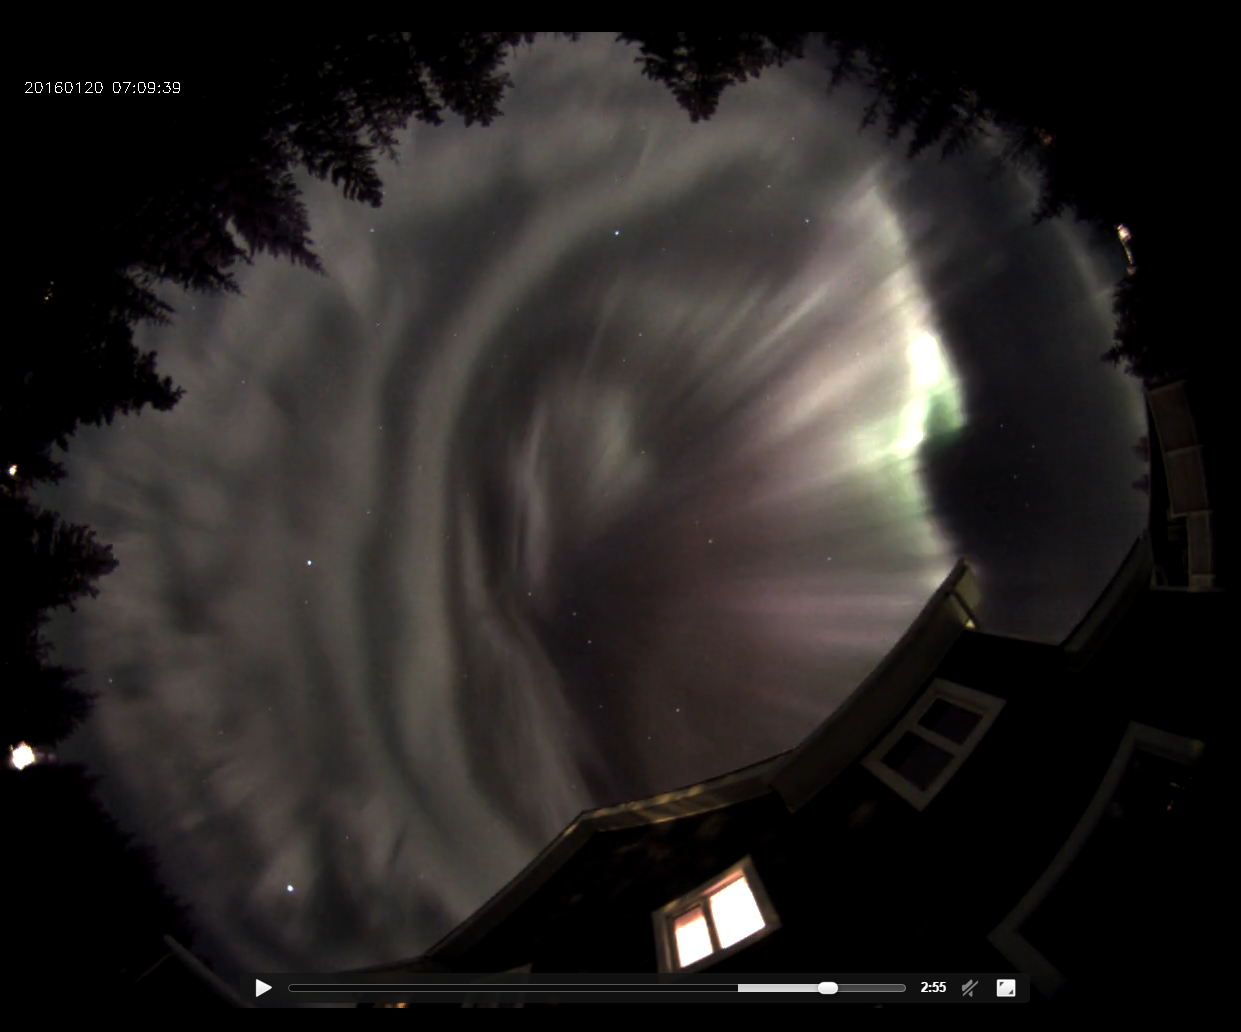
The camera starts at civil sunset, captures a 5second exposure image every 10 seconds and uploads it to a page on this website. It stops the capture at civil sunrise. After that, it generates a time lapse video of the night and uploads it as well.
This is an example of what a time lapse looks like.
Randy Flynn
Hello Thomas,
This is a very impressive build! I wish I had saw this before I started my build although I saw some similar. I too am using the ASI224mc with the stock fish-eye lens that cam with the camera. I have used a pvc weatherproof enclosure box from Lowes with an added acrylic dome, a thermostatically controlled brush-less fan and heater. At the moment it is usb wired to a desktop just inside my roll off roof observatory. I am having to use a program called HANDYAvi for camera control which works pretty well but I don’t seem to get quiet the clarity that you are, due to different codecs possibly. I would be interested to discuss your project more if you like. I have been in talks with CAMS and SkySentinel, both NASA network meteor monitoring projects. Currently they use CCTV cameras but seem to be interested in the progress of the ASI cameras. I would just forwarded information about swedish and croatian team that are using the ASI cameras with raspberry Pi’s much like yours. So my second build will hopefully be based on that since it will allow the collection of scientific data besides just imaging. Would you be interested in collaboration as I attempt to move forward with the CAMS and Skysentineal teams.
Bryan
Im wondering if this projects software can be made to work with imaging source cameras? or other ASI cameras?
Thomas
Hi Bryan,
In theory, this could work with anything producing an image. The only code that is specific to ZWO cameras is in capture.cpp. It uses ZWO’s function calls to talk to the camera but other manufacturers provide their own SDK so we could have a capture_qsi.cpp, capture_zwo.cpp, capture_imaging_source.cpp, etc.
The only problem is that I only own a ZWO camera so I can’t test the software for the other cameras.
Thomas
Bryan
Interesting, thanks for the quick reply. I assume other ASI cameras can be added as well, I only saw a couple models when I looked in github.
Ill try to play with it and my ASI1600MM (not that I would use that camera for an all sky!). Very interesting project, thanks for all your hard work!
Robin
Hi,
I too have an All Sky Camera with an imaging source (DFK) camera, but run software on a PC to capture and upload my images. I have a ASI120MM, so might try that on a PI. The only PI I have here is a model 1 B, will that work or do I need a PI2?
Thanks
Robin
Thomas
Hi Robin,
The software works on armv6 and armv7 architectures so you’ll need at least a Pi2. It “may” work on a Pi1 but I don’t have one at home so I can’t confirm it would compile properly.
Let me know if you run into problems.
Thomas
Sabrina Fells
Wow! That’s just phenomenal. What do you suggest a beginner in skycam start with?
Thomas
Hi Sabrina,
Do you mean in terms of equipment or targets to look for?
You can easily use the camera to monitor a location (observatory for example). The keogram and startrails features of the software will give you a quick way to detect cloud cover and meteors.
Cheers
Andrea Massimo Carminati
hi, where i can find the picture and timelapse after night without setting up an ftp ? they will be saved in a folder? tnx
Thomas
Hi Andrea,
The pictures and timelapse are stored on the Raspberry Pi. The folder is located at /home/pi/allsky/images/
You can also see them using the GUI under the images tab.
Andrea Massimo Carminati
ok thank you, but there is someting to do for enable the picture saving? i leave the camera out all night but there isnt any file in the images folder
Thomas
No there’s nothing to do to enable the picture saving as long as your GPS coordinates are correct. The system should calculate when night starts and then start the saving process at the same time. Saving stops at sunrise.
Camille COLOMB
Hello, I must first congratulate you and thank you for the work done and sharing.
I am an astrophotographer in France and realized last week your Allsky camera.
However I will need help once again, how to create the site visible from anywhere.
I must specify that I am a beginner in Raspberry …. etc ..
If you had the agility to guide me it would be great !!
but what you have done is already huge !!
so thank you
Camille
Thomas
Hi Camille!
I think this is what you’re looking for: https://github.com/thomasjacquin/allsky-website
Let me know if you have any questions.
Also, very nice work on the Strock-250. It reminds me of the one I built a while ago.
And superb photos of the galaxies. M51, M101 and NGC4565 are my favourite targets. I haven’t really started serious astrophoto but it’s nice to see what can be done!
Bonne journee,
Thomas
Camille
Hello Thomas,
Thank you for your passage on my site !!
it is true that the strock 250 is a marvel !! to be able to observe the universe with an instrument made of these hands is great !!
Well I really have a lot of questions about your allsky !!
I came across your page: http://www.thomasjacquin.com/allsky/
and what I would like to have, and if in addition I could add a small station eteo like Mweather it would be top and even my AAG cloudwatcher !!
But, and there is always a but !!! I am unable to do this on my own, I saw your page (https://github.com/thomasjacquin/allsky-website) but I am unable to do something!
would you be leaving to guide me?
thank you very much for everything you have done !!
Camille
Thomas
Hi Camille,
All you have to do with the allsky-website project is to download it and upload the files to your server. You can create an “allsky” directory and put everything in there. You’ll have to edit config.js to match your location.
Then you can edit scripts/ftp-settings.sh on the raspberry pi to make the upload happen. That should be all you need to do to get it to work.
Thomas
camille
Hello Thomas, it seems so simple !! but for me it is not necessarily.
Sorry for the inconvenience.
onc i have to take another raspberry to make a server, or i have to do it on the raspi of the allsky?
if I have to mount another RPI what kind of server? a recommended tutorial?
you can answer on my mail if you prefer
thank you
Bernd Rumstig
Hi Thomas,
my allskycam is running.
thank you for the script.
http://www.rumstig.com/allsky/
many Greetings
Daniel
Hello Thomas
Thank you very much for the software
It works great on a RASPBERRY PI 3B and an ASI224
Is it possible to do a time lap in manual
Have a nice day
Daniel
Thomas
Hi Daniel,
Yes, you can generate the timelapse manually. In the terminal, navigate to the allsky directory and type: ./scripts/timelapse 20190320
Ian Hepworth
Hi
This looks to be the gold standard of allsky cameras, Im new to pi and due to budget restrictions I dont have the funds for an ZWO camera.
Just about to set up a pi3B+ with a version 2 noir camera with a fisheye lens as a poor mans alternative would your code work with that?
Im also new to the world of pi so it might be a silly question
Thanks
Thomas
Hi Ian, the code is meant to work with a ZWO camera but someone re-wrote part of the code to make it work with a raspberry pi camera. I haven’t tested it but you can give it a try. After installation, you’ll need to replace the file capture.cpp by this one: https://github.com/thomasjacquin/allsky/pull/36/files
Then you’ll have to compile it: make capture
It should work (I haven’t personally tested it though) but there are some limitations. You won’t be able to use all the controls available in the software (c.f. the comments at the top of capture.cpp here https://github.com/thomasjacquin/allsky/pull/36/files).
ian hepworth
Thank you ill have a play over the weekend
Werner Klinger
Hello Thomas
i try to update a old meteor camera from the german DLR by replacing the analogue camera with an asi 120 mc and your very useful software. It’s a huge tripod with the camera and a shutter in a casing on top. On the bottom-plate lies a parabolic mirror, accurately centered, so we can use the captured images for different measurements, i. e. height an speed of meteors. The first few tests has been successful. Our astronomical club will install it on the top of a highschool, when i finished my work.
I just tried to put the dark-frame substraction into the service, but no “dark.png” appears in /allsky.
Do i have to do the procedure during the night, when the automatic session is running, or can i do it the day over? It would be necessary, because the hotpixels make it difficult to evaluate the picture when it has captured a meteor.
With kind regards,
Thomas
Hi Werner,
That project sounds fantastic. For the dark frame, I probably didn’t document it very well but it only works at night. However, you can trick the software by setting your longitude temporarily to a different value (somewhere on earth where it’s dark). The allsky software will then start in night mode and you can enable the dark frame capture (with a cap on the lens). Once you’ve captured a dark, you can switch your longitude back and it should start using the dark frame.
Werner Klinger
Hello Thomas,
a few weeks of testing are over and all is working fine. I added “the machine” in the “I made it”-Section on Instructables. Sorry for the late reply.
I take the darkframe now during the night. It makes no sense to trick around, because of the higher temperature of the sensor during the day. Depending on the weather conditions (average temperature during the night) it will be useful to take the dark frame a few hours after starting. Maybe i collect different darks for various temperatures and use them when the conditions are changing.
At the moment it looks like that each 5 degrees Celsius (plus or minus) an adjustment is necessary to minimize the color noise of the camera.
Greetings
Werner
Chris
Thomas,
Thanks for this great software, i try the longitude trick that works was looking for the dark file during day time. So the dark file created is ok, i have max exposure set to 20s so by 16s i have nice black field. but with 20s i dont see any effect of the darks substraction any idea why. Is the dark file only used during processing. Can you explain more, or what i do wrong? A Small otherthing is that the tumbnails of the startrail and the other are not generated any idea where to look abou that. Thanks in advance
Thomas
The dark subtraction doesn’t depend on the exposure so it should work fine for 20 seconds and more.
stefaco
Hello Thomas,
I’m running about few February an no online version of all sky and it s very beautiful, thank you very much for this job, i think publish to online very soon ..
But before, i would like to solve a trouble : about this last 15 days . at the end of each night script for create timeline,startrails and keograms are not generate everyday (1/5 days), .. do you think it’s software or hardware trouble (raps3+T7cam “clone zwo120”)
There is somewhere a log to to see why this trouble arrive?
Thanks in advance
Stef
Thomas
Hi Stef,
I haven’t used a T7 camera so I can’t tell for sure if it’s coming from the hardware but you can see if there were some errors by running this in a terminal:
service allsky status
It may have more information there.
Paul
Thomas
This has been a really great project. I have my version up and running but want to know how you handle thermal control? I am using an 8″x8″x5″ IP65 junction box I bought through Amazon for $21. When running it during the day, the ASI224 was running at above 60C. This is above storage temperature let alone operating temperature. My solution was to add two 12VDC fans, which required some holes in my sealed, weather-tight junction box. They are controlled through relays so I modified the code a little bit to add some relay logic. It does keep the sensor temperature way down. Temperature is consistently between 30C and 35C. Since the fans do not run continuously, the components can act like a heater at night providing dew control. I have yet to see how things will survive the winter.
So what do others do to keep their system cool?
Thanks
Paul
Thomas
Hi Paul, thanks for the description of the modifications you made to keep the camera running cool. Camera owners have all their personal hacks to protect it from over-heating. I would suggest to take a look at the bottom of that page https://www.instructables.com/id/Wireless-All-Sky-Camera/ before the comments section. You’ll see a list of builds from the community.
I’ll add your camera to the map.
Rob
Hi Thomas! Looking forward to building this project in the coming months. I am comfortable with the hardware and the programming, but I’ve never set up a website from a home server before. Where would you recommend I start to get a site like yours up and running? Do you use WAMP Server or something similar? Any help is appreciated! Where would I copy your Allsky website files to? Thanks and let me know!
Rob – SLC, UT
Thomas
Hey Rob,
For a website on a home network, you can use LAMP or WAMP for sure. Just drop the content of https://github.com/thomasjacquin/allsky-website in the public_html or www folder depending on your server configuration.
On the camera side, you’ll need to modify scripts/ftp-settings.sh to point the host to your home computer IP.
Rob
Right on! Thanks! I discovered that using a wordpress site hosted by bluehost actually makes the most sense for me. However, I cannot seem to figure out where to dump the files on my host’s directory to make the page appear correctly at “website.com/allsky” without using the main site’s theme. Can you point me in the right direction? For context, my main theme is at the location “public_html/wp-content/themes/”. Thanks again for your help!
Rob
Nevermind! Just figured it out after 30 seconds of extra thought. Thanks again! I’ll share my build once I’ve completed the hardware.
Arnaldo
Hi Rob, I am at the same point but 30 seconds is not enough for me to figure it out… Could you tell me what you did to get it to work? Thanks!
Christof Wiedemair
Hi Thomas! Is there an updated list of ASI cams which work with your software? I would prefer using a BW-cam instead of a color version (for higher resolution), but on your github repository there is only the ASI 120 that is listed with MM suffix. I’m a teacher and two of my students can’t wait to build your allsky cam! Best wishes, Christof
Thomas
Hi Christof,
Any ZWO camera should work because they are all using the same library. I just don’t own them all so I haven’t been able to confirm it. Then it’s just a matter of sensor size. Keep in mind that a large sensor produces a large JPG or PNG so it puts more load on the CPU when the timelapse, keograms and startrails get created.
However, with the new RPi4, you should be able to handle a 2000px wide image without any issues.
Christof Wiedemair
Thank you, Thomas! I’ll inform you in the case of success! Best wishes! Christof
ian hepworth
Not a camera problem but a Im doing something wrong but not sure where.
http://www.skippyinspace.com I cant get the live image to upload to this page, Im sure its to do with the code somewhere. Ive dropped a copy of the resize imagefile in this directory and the website displayed the image but didn’t update it I have since deleted it
Currently the live image updates to the allsky directory rather than the root directory of the website
ie if you look at http://www.allsky.skippyinspace.com you can see the live image but non of the links work and my preference is for the live cam to be on the home page with the weather banner.
Also haven’t had clear skys since the camera went outside, Im using a Pi Noir V2 Camera
Thanks
Ian
Rolf
Hi,
Great project, Used it Over a few weeks .
Tried also daytime capture by setting in config.sh to 1, But the camera allways takes only one shot.
Any ideas?
Best regards,
Rolf
Thomas
You may need to play with the daytimeDelay option which is the delay between individual shots.
Simon
Love the project, and would love to get this working on my old DMK camera, I have the DMK camera working under EKOS using a video for linux driver (V4L2) on the raspberry pi but don’t know how to create the capture.cpp file mentioned above, any pointers on the approach to make your software work with the video for linux driver would be awesome!
Wilhelm Michael Kasakow
Hello Thomas,
Last year I built an Allsky camera according to your plan for our observatory.
http://www.stein-exclusiv.de/kurzfristig/Allsky-Construktion.jpg
http://www.stein-exclusiv.de/kurzfristig/Allsky.jpg
The Raspberry-PI3 is located in the observatory and the camera in a heated housing on the roof. Everything is actually going perfectly. The camera takes pictures in the dark and generates a video at the end of the night. Thank you for your great project!
The only problem is uploading the mp4 file to our server.
Despite checking all settings, the file is not downloaded to the server. We have no idea what we’re doing wrong.
We also installed the latest version of your software last week. Here are a few pictures of our settings
http://www.stein-exclusiv.de/kurzfristig/Config.jpg
http://www.stein-exclusiv.de/kurzfristig/FTP-Settings.jpg (the password is fictitious)
We would be very happy to receive tips and information.
Incidentally, I also spent several days in Whitehorse on my Yukontour in 2013. I love Canada 🙂
Best wishes
Willi
Thomas
Hi Wilhelm,
Thanks for reaching out. That looks like a really nice build with a dew heater.
For the upload issue, my first guess is that your paths are not correct.
They are supposed to be the full path of the directory on your server. For example, here’s parts of my ftp-settings.sh file
IMGDIR='/lamp/web/vhosts/www.thomasjacquin.com/htdocs/allsky/'MP4DIR=$IMGDIR'/videos/'
KEOGRAM_DIR=$IMGDIR'/keograms/'
STARTRAILS_DIR=$IMGDIR'/startrails/'
You will notice that I am re-using $IMGDIR in the last 3 lines to make things more readable.
You can find the full path of your directory by using FileZilla or just connecting to your server via CPanel or SSH..
Michael
Hi Thomas,
thanks a lot for this great piece of inspiration. I am about setting up my own camera and wonder if also ASI178MM mono camera could be used.
Kind regards,
Michael
Thomas
Hi Michael,
The ASI178MM will work fine. The sensor is 6.4Mpx and produces large images so make sure to use the Raspberry Pi 4 with lots of memory to handle the timelapse and other memory intensive operations.
chris
Hi thomas
First thanks for this great software, it running. i have one issue my thumbnails are not thre wile the files are in the directory of for example keogram-20200505.jpg. What can be the cause that the thumbnails are not generated
Thomas
Hi Chris, Are you saying that the thumbnails directory is missing when images get saved at night?
This directory gets created when the first image of the night is saved. It’s at line 11 on this file: https://github.com/thomasjacquin/allsky/blob/master/scripts/saveImageNight.sh
Chris
Thomas thanks for you reaction its on the website, so files are ftp to the server the files are in the directory. bij selecting archived keograms. you dont see the thumbnail. but selecting the thumbnail the not there thumbnails it opens the images. The question is how are the thumbnails are generated on the website and why its not displayed. the files are in the directory on the web site. I can share my web site with you in private message, but i dont want to share it public.
Chris
Thomas
Line 29 on this file is where the thumbnails directory is created.
https://github.com/thomasjacquin/allsky-website/blob/master/keograms/index.php
If the thumbnail for a certain image doesn’t exist, it will create it when you open the keograms page.
Make sure your host is running PHP.
Feel free to to send me the url using the contact form.
chris
Thomas
On the web server, synology i have enable PHP 7.3, the dir thumbnails is not created. i did it with the hand now. The images are there
chris
Fixed it was the right on the server, php was not able to create the tumbnail directory. Thansk for your support hint and tips.
Frank
Hi Thomas,
At first, thank you for your soft ! It’s great.
I use a RP4 and An ASI224MC. When I run the program, I see the image-resize.jpg on my ftp server. Great.
But I see only the last image, not all images (every x second) ? Where the images are save ? Is-it an option ?
Thank you so much and sorry for this question…
Frank
Thomas
Hi Frank, the images are not saved on the server. They are kept locally on the Raspberry Pi. Only the current image is uploaded and it gets overwritten on the server. This is to avoid the need for huge storage capacity on the server. If you want to see the images, you’ll need to open a port on your router and connect to your RPi. In that case, you can use the GUI to view the images.
Frank
Ha ok, thank you so much. I will see that.
Take care,
Frank
Frank
Hi Thomas,
I tried the camera this night but no images this morning.
The capture has began this mornig at 8h AM instead 22h. I live in the west of France so I put 46.8N and 0.7E. For then angle of the sun, I put -0.6. I don’t understand my problem. Do I have indicate + 0.6 ?
Thank you.
Frank
Frank
In fact, I think I’ve a problem with the night and day. For example, now in France (the day), the soft save the picture with a gain of 50. Yesterday night, near 23h, the gain stay at 0 and the soft didn’t save the picture. Maybe a problem with the Rp4 ?
Frank
Ok, I found the problem. The menu doesn’t change the file, I’ve to write manually in the file of the camera’s configuration. All seems perfect
So, it’s great ! 🙂
Chris
Thomas
I have still one issue, thats i have split frame images which caused flickering during time-laps. I use the ZWO120MM on Raspberry 3B, i already enabled max_usb_current=1 so the max USB current on the PI is now max and i moved to raw8 Also did test with the USB settings in allsly no idea how to fix this split frame images. Do you have any idea and is there possibility that this frames will be skipped during creation of the timelapse?
Thomas
This issue seems specific to ASI120 models. Maybe this could help https://github.com/thomasjacquin/allsky/issues/167
Frank
Hi Thomas,
I use a ASI120MC-S and I’ve a problem with the autoexposure for the night mode. I must restart the application to enable this mode (the gain stays at 0 without the restart).
Do you know how to includ a restart (automatic) just after the night mode ?
Thank you.
Have a good day !
Thomas
Hi Frank,
What settings do you have for exposure and gain? This should work properly but if you really need to restart, you can append a reboot command at the end of scripts/endOfNight.sh:
sudo reboot now
This might work but you may have to configure the Pi user’s permissions to run this command.
Frank
Hi Thomas,
Thanks a lot. I’ll try it asap.
I’ll give you my paramaters on Github.
Frank
Brian
Hi Thomas,
Excellent job with everything. 🙂
Now I built by All sky setup running a Rasberry 4PI and testing with my ZWO290mm camera. (I plan on using another ZWO cam as that is my guide cam at the moment Either a ZWO120mm or 224mc I can’t decide yet lol).
So on the Rasberry Pi side with cam, I am able to do everything as I can see the files stored on the Raspberry PI Folders. My current issue is setting it up on my website. I am hosting with Hostgator and setup up a simple WordPress site for testing and used Filezilla to add the website files to a newly created folder called “allsky” under Public HTML. So all the files are in there and when I go to Astromedia.com/allsky I can see your template and did not configure it to my settings yet. I also did not do anything with the FTP in the control pannel? I just unzipped and placed the files in the Public.HTML as “allsky” as I said above.
Now the trouble is that I can’t seem to connect to my site from the Rasberry PI to my site. I am running PHP 7.1 and just installed an SSL certificate as well (I tried without and had same problem). Bellow is the error’s that I am getting when I check the status. I also adjusted the settings on your script to true for everything.
So below is what I keep seeing in the terminal. The only thing I edited was my login and username below. (also to note I am using the terminal and not the GUI)
Thanks in Advanced 🙂
# FTP/SFTP settings
PROTOCOL=’ftp’
USER=’myusername’
PASSWORD=’mypassword!’
HOST=’astrometeor.com’
IMGDIR=’/allsky/’
MP4DIR=’/allsky/videos/’
KEOGRAM_DIR=’/allsky/keograms/’
STARTRAILS_DIR=’/allsky/startrails/’
llsky.service – All Sky Camera
Loaded: loaded (/lib/systemd/system/allsky.service; enabled; vendor preset: enabled)
Active: active (running) since Sun 2020-06-14 01:31:44 EDT; 13h ago
Main PID: 742 (allsky.sh)
Tasks: 6 (limit: 4915)
Memory: 290.1M
CGroup: /system.slice/allsky.service
├─742 /bin/bash /home/pi/allsky/allsky.sh
└─879 ./capture -angle -6 -autoexposure 1 -autogain 0 -bin 1 -brightness 50 -coolerEnabled 0 -darkframe 0 -daytimeDelay 5000 -delay 10 -exposure 10000 -filename image.jpg -flip 0 -fontcolor 255 255 255 -fontline 1 -fontname 0 –
Jun 14 15:11:59 raspberrypi allsky.sh[742]: cd: Fatal error: Certificate verification: certificate common name doesn’t match requested host name ‘astrometeor.com’ (C7:9A:17:85:5D:C8:AD:73:1C:7B:0D:AE:8D:54:E2:C0:A8:25:57:BC)
Jun 14 15:11:59 raspberrypi allsky.sh[742]: put: image-resize.jpg: Fatal error: Certificate verification: certificate common name doesn’t match requested host name ‘astrometeor.com’ (C7:9A:17:85:5D:C8:AD:73:1C:7B:0D:AE:8D:54:E2:C0:A8:25:5
Jun 14 15:12:18 raspberrypi allsky.sh[742]: cd: Fatal error: Certificate verification: certificate common name doesn’t match requested host name ‘astrometeor.com’ (C7:9A:17:85:5D:C8:AD:73:1C:7B:0D:AE:8D:54:E2:C0:A8:25:57:BC)
Jun 14 15:12:19 raspberrypi allsky.sh[742]: put: image-resize.jpg: Fatal error: Certificate verification: certificate common name doesn’t match requested host name ‘astrometeor.com’ (C7:9A:17:85:5D:C8:AD:73:1C:7B:0D:AE:8D:54:E2:C0:A8:25:5
Jun 14 15:12:40 raspberrypi allsky.sh[742]: cd: Fatal error: Certificate verification: certificate common name doesn’t match requested host name ‘astrometeor.com’ (C7:9A:17:85:5D:C8:AD:73:1C:7B:0D:AE:8D:54:E2:C0:A8:25:57:BC)
Jun 14 15:12:41 raspberrypi allsky.sh[742]: put: image-resize.jpg: Fatal error: Certificate verification: certificate common name doesn’t match requested host name ‘astrometeor.com’ (C7:9A:17:85:5D:C8:AD:73:1C:7B:0D:AE:8D:54:E2:C0:A8:25:5
Jun 14 15:12:58 raspberrypi allsky.sh[742]: cd: Fatal error: Certificate verification: certificate common name doesn’t match requested host name ‘astrometeor.com’ (C7:9A:17:85:5D:C8:AD:73:1C:7B:0D:AE:8D:54:E2:C0:A8:25:57:BC)
Jun 14 15:12:59 raspberrypi allsky.sh[742]: put: image-resize.jpg: Fatal error: Certificate verification: certificate common name doesn’t match requested host name ‘astrometeor.com’ (C7:9A:17:85:5D:C8:AD:73:1C:7B:0D:AE:8D:54:E2:C0:A8:25:5
Jun 14 15:13:18 raspberrypi allsky.sh[742]: cd: Fatal error: Certificate verification: certificate common name doesn’t match requested host name ‘astrometeor.com’ (C7:9A:17:85:5D:C8:AD:73:1C:7B:0D:AE:8D:54:E2:C0:A8:25:57:BC)
Jun 14 15:13:19 raspberrypi allsky.sh[742]: put: image-resize.jpg: Fatal error: Certificate verification: certificate common name doesn’t match requested host name ‘astrometeor.com’ (C7:9A:17:85:5D:C8:AD:73:1C:7B:0D:AE:8D:54:E2:C0:A8:25:5
~
Also to clarify…What is the common name and what is the hostname? Would the host name be my website or would it be the DNS that it uses or just the sites IP address?
Thanks again in Advanced 🙂
Thomas
Hi Brian,
Can you try
ssh astrometeor.comfrom a terminal on the RPi? This should add your host to the list of known hosts and then you should be able to talk to it.Brian
Hi Thomas,
Thanks for the quick response 🙂
I tried putting that in, and it said it added it and got a warning ect…But it appears that it added it and then it was asking for password. When it asked for the password, it would not let me type anything in the terminal, I even tried copy and paste my website’s server. That is what it is asking for?
Also after reboot when I type in “ssh astrometeor.com” it says this. but still won’t let me type in anything after it says that.
“pi@raspberrypi:~ $ ssh astrometeor.com
pi@astrometeor.com‘s password:
I also went back to see the status and this is the message I get.
● allsky.service – All Sky Camera
Loaded: loaded (/lib/systemd/system/allsky.service; enabled; vendor preset: enabled)
Active: active (running) since Mon 2020-06-15 19:50:30 EDT; 6min ago
Main PID: 737 (allsky.sh)
Tasks: 6 (limit: 4915)
Memory: 110.6M
CGroup: /system.slice/allsky.service
├─737 /bin/bash /home/pi/allsky/allsky.sh
└─858 ./capture -angle -6 -autoexposure 1 -autogain 0 -bin 1 -brightness 50 -coolerEnabled 0 -darkframe 0 -daytimeDelay 5000 -delay 10 -exposure 10000 -filename image.jpg -flip 0 -fontcolor 255 255 255 -fontline 1 -fontname 0 –
Jun 15 19:55:11 raspberrypi allsky.sh[737]: cd: Fatal error: Certificate verification: certificate common name doesn’t match requested host name ‘astrometeor.com’ (C7:9A:17:85:5D:C8:AD:73:1C:7B:0D:AE:8D:54:E2:C0:A8:25:57:BC)
Jun 15 19:55:12 raspberrypi allsky.sh[737]: put: image-resize.jpg: Fatal error: Certificate verification: certificate common name doesn’t match requested host name ‘astrometeor.com’ (C7:9A:17:85:5D:C8:AD:73:1C:7B:0D:AE:8D:54:E2:C0:A8:25:5
Jun 15 19:55:26 raspberrypi allsky.sh[737]: cd: Fatal error: Certificate verification: certificate common name doesn’t match requested host name ‘astrometeor.com’ (C7:9A:17:85:5D:C8:AD:73:1C:7B:0D:AE:8D:54:E2:C0:A8:25:57:BC)
Jun 15 19:55:26 raspberrypi allsky.sh[737]: put: image-resize.jpg: Fatal error: Certificate verification: certificate common name doesn’t match requested host name ‘astrometeor.com’ (C7:9A:17:85:5D:C8:AD:73:1C:7B:0D:AE:8D:54:E2:C0:A8:25:5
Jun 15 19:55:46 raspberrypi allsky.sh[737]: cd: Fatal error: Certificate verification: certificate common name doesn’t match requested host name ‘astrometeor.com’ (C7:9A:17:85:5D:C8:AD:73:1C:7B:0D:AE:8D:54:E2:C0:A8:25:57:BC)
Jun 15 19:55:47 raspberrypi allsky.sh[737]: put: image-resize.jpg: Fatal error: Certificate verification: certificate common name doesn’t match requested host name ‘astrometeor.com’ (C7:9A:17:85:5D:C8:AD:73:1C:7B:0D:AE:8D:54:E2:C0:A8:25:5
Jun 15 19:56:06 raspberrypi allsky.sh[737]: cd: Fatal error: Certificate verification: certificate common name doesn’t match requested host name ‘astrometeor.com’ (C7:9A:17:85:5D:C8:AD:73:1C:7B:0D:AE:8D:54:E2:C0:A8:25:57:BC)
Jun 15 19:56:07 raspberrypi allsky.sh[737]: put: image-resize.jpg: Fatal error: Certificate verification: certificate common name doesn’t match requested host name ‘astrometeor.com’ (C7:9A:17:85:5D:C8:AD:73:1C:7B:0D:AE:8D:54:E2:C0:A8:25:5
Jun 15 19:56:26 raspberrypi allsky.sh[737]: cd: Fatal error: Certificate verification: certificate common name doesn’t match requested host name ‘astrometeor.com’ (C7:9A:17:85:5D:C8:AD:73:1C:7B:0D:AE:8D:54:E2:C0:A8:25:57:BC)
Jun 15 19:56:27 raspberrypi allsky.sh[737]: put: image-resize.jpg: Fatal error: Certificate verification: certificate common name doesn’t match requested host name ‘astrometeor.com’ (C7:9A:17:85:5D:C8:AD:73:1C:7B:0D:AE:8D:54:E2:C0:A8:25:5
~
Thanks again for helping me, I will make sure you have some more Coffee 🙂
Thomas
The password is not the important part. It’s normal that it fails because you didn’t specify a user. The important part is that it added the website to the list of knows hosts. Have you tried to disable the SSL certificate?
Simon Minnican
I’m about to start this project but I’ve already been tinkering with the web interface https://github.com/thomasjacquin/allsky-website and have a page ready to go. I notice Thomas that you’ve said that “config.js is the only file you need to modify.” However, the web page title is contained in the index.html file and without editing all pages would show “Yukon” of course. Thank you for this fantastically detailed project.
Thomas
Thank you Simon, I’ll make sure to move that setting into config.js
Brian
Thanks Thomas,
I did not disable the SSL yet. I will try that and probably start a new WP site from scratch just incase I messed up any settings in the Cpanel.
🙂
Simon Minnican
Hi Thomas
I’m getting an error and I have no idea how to resolve it. When I check the allsky service status I get this response:
“Jun 21 14:28:21 raspberrypi allsky.sh[547]: cd: Fatal error: Certificate verification: Not trusted (4A:98:A4:7E:69:CC:DB:35:96:9E:B1:CF:CC:97:EC:37:5A:28:2D:4C)”
Do you have any idea what this means and how would I resolve it please?
Thanks in advance.
Simon Minnican
Scratch that as I saw Brian’s issue above and tried that and the issue is resolved. I don’t however get any “live” images on my webpage. The only image I see is the loading image and the only file being uploaded is the “image-resize.jpg”. I will leave the camera on tonight and see what happens in the morning.
Thomas
If image-resize.jpg is uploaded then it’s a good thing. Just make sure config.js has the right settings for your setup (file name, location, etc).
Alex
Have you considered replacing the camera with the new Raspberry Pi High Quality Camera which takes CS-mount lenses? The Pi HQ camera is $50.
Thomas
Hi Alex, user Rob has made a fork of the repository that works with the RPi HQ Camera. https://github.com/RobboRob/allsky
Alex
Thanks I have the RPi HQ running now. I’d like to convert the lftp to something like scp which doesn’t have cleartext passwords.
Simon Minnican
Thanks Thomas for your help. The camera is up and running almost perfectly. Could you point me to the code that would allow me to change the exposure stamp on the images please. I wish to change it from exposure in seconds to exposure in milliseconds as I’ve noticed that during the day the stamp says 0.000s. My camera is located in Boston, Lincolnshire, UK if you’d like to add to your map please. The coordinates are latitude: 52.98,
longitude: -0.023. The website is http://www.minnican.com .Thanks again.
Thomas
Hi Simon, the line to change is line 860 in capture.cpp https://github.com/thomasjacquin/allsky/blob/master/capture.cpp#L860
You’ll have tu run
make captureafter you’ve change it to recompile the program.I’ll add you to the map!
Nico
Good afternoon
thank you for this beautiful project
I have now made the allskye camera and also want to make one that makes a timelapse of the clouds during the day
how can I adjust the time so that it starts recording at 5 am and stops at 8 pm
do not know if this is possible
thanks in advance
greetings from Nico
Thomas
Hi Nico, You could enable daytime capture by following this thread https://github.com/thomasjacquin/allsky/issues/48.
If the start and end times are always 5am and 8pm, you could use a CRON job entry to trigger the capture and the timelapse.
nico
Thomas,
Thank you
Where do I place the Cron job and how
Nico
Thomas
Take a look at this https://opensource.com/article/17/11/how-use-cron-linux
You will probably need to point to /home/pi/allsky/scripts/timelapse.sh
I haven’t done it myself so I can’t say if it’ll work for sure. If you need more help about it, you can post a question in the issue tracker on GitHub. I believe some users have used CRON for other tasks.
nico
Thomas,
Thank you
Nico
David
Hi Thomas,
Here David from France,
Is it possible to have a full video of the night rather than have a 5sec pic every 10 seconds ?
Thanks for your reply and great project !
David
Hi Thomas,
This is David from France.
Is it possible to have a continuous recorging of the camera ? I understand that the setup actually take a “5sec picture” every 10 seconds.
Thanks for your reply.
Thomas
Well you can change the delay between images. The default is 10ms. The duration of the image is set by the exposure value in the settings. You can’t really get a true live stream because it’s too dark to take short exposure images. You need at least a few seconds to get a proper image.
David
ok, thanks you for your reply.
It’s different from the setup in konw from CCD camera with 0.00005 lux, but i understand that.
chris Alberts
Hi Thomas
I have a request for a function to add.
I like to step through the image on somedays to verify if there are meteors. this images I like to save.
Now I need to gamble after I saw the timelapse where to look. Is there a possibility to make this and add step through images function and mark the images to save?
thanks of in advance
flipper07
Hello, thank you for this great job.
I am in the process of manufacturing too.
I made a test with the camera zwo 224 it works well.
But I would like to use the zwo asi 120MC clone camera, but it doesn’t work.
I updated the site for the ASI120MC-compatible.iic compatible camera.
I added the line
program_usb_boot_mode = 0
to the config.txt file
the camera works well on windows 10.
Thank you for helping me.
Sorry for my google translation I speak french
Thomas
Bonjour Bruno, la premiere chose est de determiner si la camera fonctionne correctement avec le Raspberry Pi. Entrez “lsusb” dans un terminal pour voir si la camera est listee. Seconde chose: Entrez “cd allsky” and “./allsky.sh” dans un terminal et copiez l’erreur dans les commentaire.
Flipper07
Merci Thomas, pour votre réponse.
Si ca vous dérange pas je vous écrit en français (peut être que vous parler le français?)
Voila j’ai entre la commande lsusb
il m’affiche:
Bus 003 Device 001: ID 1d6b:0002 Linux Foundation 2.0 root hub
Bus 002 Device 001: ID 1d6b:0003 Linux Foundation 3.0 root hub
Bus 001 Device 004: ID 03c3:120b
Bus 001 Device 002: ID 2109:3431 VIA Labs, Inc. Hub
Bus 001 Device 001: ID 1d6b:0002 Linux Foundation 2.0 root hub
Je pense que c’est celui-là :
Bus 001 Device 004: ID 03c3:120b
Car quant je débranche la camera et rebranche, cette ligne disparait et revient
Voici ce que m’affiche ./allsky.sh
pi@allsky:~/allsky $ ./allsky.sh
Making sure allsky.sh is not already running…
lsusb: option requires an argument — ‘D’
Usage: lsusb [options]…
List USB devices
-v, –verbose
Increase verbosity (show descriptors)
-s [[bus]:][devnum]
Show only devices with specified device and/or
bus numbers (in decimal)
-d vendor:[product]
Show only devices with the specified vendor and
product ID numbers (in hexadecimal)
-D device
Selects which device lsusb will examine
-t, –tree
Dump the physical USB device hierarchy as a tree
-V, –version
Show version of program
-h, –help
Show usage and help
ZWO Camera not found. Exiting.
Apparament il dit qu’il ne trouve pas la camera?
Merci encore.
Bruno
flipper07
Re bonjour.
Je répond a mon message
je ne comprend pas je viens d’essayer de nouveau et la ça fonctionne….
Bizarre non???
Je vais voir par la suite si ça fonctionne tout le temps.
flipper07
Encore moi, pour l’instant ça fonctionne.
Mais j’ai un Probleme de condensation sur le dome.
que pourrai-je mettre (une résistance chauffante) mais quelle model?
Merci de me dire.
Je vais essaye de crée un site et mettre les photos de ma réalisation.
Encore merci pour tout.
Bruno
Thomas
Il y a une discussion a propos de la condensation sur ce thread. https://github.com/thomasjacquin/allsky/issues/113
jy RAYMOND
bonjour Thomas
voila une journée que je bloque sur mon installation de votre application sur un rasberry 3 j’ai mis l’OS rasdebian à jour au maximum et irrémédiablement j’arrive à la même erreur de “Opencv”
je maitrise mal Linux et je sais à quel points ce n’est pas une science exact pour les neophites!!!
je vous soumet le resultat de ma console lorce que je lance : ./allsky.sh preview
peut etre avez vous une minute pour me mettre sur la piste ??
par avance merci
jean yves
———————————————————————————
pi@raspberrypi:~ $ cd allsky
pi@raspberrypi:~/allsky $ ./allsky.sh preview
Making sure allsky.sh is not already running…
can’t get debug descriptor: Resource temporarily unavailable
Trying to automatically choose between ZWO and RPI camera
ZWO camera found. Choosing ZWO
Settings check done
CAMERA: ZWO
CAMERA_SETTINGS: /home/pi/allsky/settings_ZWO.json
Starting allsky camera…
******************************************
*** Allsky Camera Software v0.7 | 2020 ***
******************************************
Capture images of the sky with a Raspberry Pi and an ASI Camera
Add -h or -help for available options
Author: Thomas Jacquin –
Contributors:
-Knut Olav Klo
-Daniel Johnsen
-Yang and Sam from ZWO
-Robert Wagner
-Michael J. Kidd –
-Chris Kuethe
Listing Attached Cameras:
– 0 ZWO ASI224MC
ZWO ASI224MC Information:
– Resolution:1304×976
– Pixel Size: 3.8μm
– Supported Bin: 1 2
– Color Camera: bayer pattern:RG
– SDK version 1, 16, 3, 0
– Initialise Camera OK
– Sensor temperature:29.500000
Capture Settings:
Image Type: ASI_IMG_RGB24
Resolution: 1304×976
Quality: 95
Exposure: 10000ms
Max Exposure: 20000ms
Auto Exposure: 1
Gain: 50
Max Gain: 200
Cooler Enabled: 0
Target Temperature: 0C
Auto Gain: 0
Brightness: 50
Gamma: 50
WB Red: 53
WB Blue: 90
Binning: 1
Delay: 10ms
Daytime Delay: 5000ms
USB Speed: 40
Text Overlay: text
Text Extra Filename:
Text Extra Filename Age: 0
Text Line Height 30px
Text Position: 15px left, 30px top
Font Name: 0
Font Color: 255 , 255, 255
Small Font Color: 0 , 0, 255
Font Line Type: 16
Font Size: 7.0
Font Line: 1
Outline Font : 0
Flip Image: 0
Filename: image.jpg
Latitude: 60.7N
Longitude: 135.05W
Sun Elevation: -6
Preview: 1
Time: 1
Darkframe: 0
Show Details: 1
Debug Level: 0
Starting daytime capture
Saving auto exposed images every 5000 ms
Press Ctrl+C to stop
OpenCV Error: Bad flag (parameter or structure field) (Unrecognized or unsupported array type) in cvGetMat, file /build/opencv-L65chJ/opencv-3.2.0+dfsg/modules/core/src/array.cpp, line 2501
terminate called after throwing an instance of ‘cv::Exception’
what(): /build/opencv-L65chJ/opencv-3.2.0+dfsg/modules/core/src/array.cpp:2501: error: (-206) Unrecognized or unsupported array type in function cvGetMat
./allsky.sh : ligne 86 : 1046 Abandon $ALLSKY_HOME/capture $ARGUMENTS
pi@raspberrypi:~/allsky $
jochen
Hi. 1st of all thanks a lot for your donation to the OSS community. I have purchased an ASI385MC that works will with your software with static pictures or MP4. My intention however is to record falling stars. So I need to dump the pics into some kind of ring buffer and as soon as any motion is detected the buffer is flushed to a file otherwise it is dumped.
There is some noce SW out there doing this for you (https://motion-project.github.io/) but it requires the camera to be accessible via /dev/video which ZWO ASI is not. I have already approached the vendor for a driver but the simply replied “not supported” 🙁 .
HAs anybody out there ever pursued a similar goal with ZWO ASI or managed to turn the vendor provided libs into a full-fledged v4l driver ? Thank you
Stefano
is it possible to use the raspberry camera v2?
Geoff
Another comment to basically say thank you for creating and sharing this 🙂
During our second lockdown I had to work from home (again!) as a school science technician, which is tricky, so one of the things I did was look at funding opportunities. The IoP were offering grants for anything non-curriculum based, but with worthwhile local physics aspects, so applying for an all-sky cam seemed logical. We got the funding and this afternoon, using some of my “you all gets summer holidays off!” (we don’t!) time I tried setting it up using your software. Couldn’t have been easier, as long as you have the tiniest background in linux etc. Only problem I ran in to was a mismatched FTP certificate (shared server, meh), but that was easily solved with a lftp.conf edit
Sent you a couple of beers, and very well deserved 🙂
Thomas
Thanks a lot Geoff. I’m glad you found the project useful and I’m really happy that it will benefit students!
Dan
Recently loaded your software on an Rpi4 using a ZWO120 cam. Software appears to have installed correctly but when I go to the admin webpage, I get alternating messages in the preview pane saying “allsky software starting up”, “allsky software is not running”. I am not very linux savy, I literally got as far as i did just copy and pasting the commands from the github site. Any help you could provide would be greatly appreciated. Thanks!
Thomas
Hi Dan, if I were you, I would post a question on the GitHub page (https://github.com/thomasjacquin/allsky). You will get more help there because someone probably had the same error before you.
Chris
Dan, that’s right wat Thomas is saying. Most likely you find in the /var/log/allsky asi time out errors. This is due wrong capture.cop pushed to the git repo. There is als most solution. @Thomas get in contact with Eric to get the repo up-to-date with the right capture.cpp
Bernard
Hello, i have built my own Allsky with also an ASI224MC and a Pi4 inside the box, so i have only a 12V power cable to bring to the box, and then wifi connection to my local network. All works fine with the Allsky software too.
But i don’t see any heating system or even fans inside the box, and your image quality is excellent.
So can you confirm if you didn’t add anyhting else than the camera and raspberry inside the enclosure ?
Thomas
Hi Bernard, I don’t have any ventilation or heating system but I also live north of the 60th parallel so it doesn’t get too hot in summer.
Take a look at the instructables page to see what other users are doing to fight the heat and dew. There is also a facebook page where people share building tips.
Carlos
Thanks so much Thomas for your work and for share the project with everybody.
Did you considered to add a mode with RAW color images?
It will be really useful to convert your project in a Pro-Am project to do some scientific measures in the images.
I made my own setup with a Raspi 4 and the Raspi HQ cam but I miss the RAW images, instead of jpg or png.
Best regards from Spain 🙂
Thomas
Hi Carlos, when using a ZWO camera you have an option between RGB, RAW 8bit and RAW 16bit. However the RPiHQ code doesn’t support RAW yet. You could post a question on the GitHub repo and ask if anyone is working on supporting libcamera-raw. https://github.com/thomasjacquin/allsky/discussions
Carlos
Hi Thomas.
Thanks so much for the info. I will post on github about that issue.
Another comment. My RPi doesn’t appear on your map but is completely configured. ¿The map is updated?